ต้องบอกก่อนว่า จริงๆแล้วผมไม่ได้เก่งเรื่องวงจรอะไรมากนัก เรียกว่าโง่เลยก็ได้ แต่ช่วงนี้กำลังอยากจะศึกษาเรื่องสลับไมล์ เลยเป็นที่มาของข้อมูลพวกนี้ครับ เลยอยากจะมาแบ่งปันกัน ได้มาจาก Web นอกนะครับ (ผมยังไม่ได้ลองทำด้วยตัวเองนะครับ)
You need to update your how-to on the 01-02 to 03+ cluster swap.
When I went and did mine, I found out the hard way that the yellow/black wire from the green connector had to be extended to reach into the blue connector.
What I did was clip off the extra white/red wire, since it was long, and then spliced it into the yellow/black wire. That way it'll reach over there. Remind them that if they do that, they need to cap off the white/red since it's a 12v constant wire.
Other than that, I think that was it. Pretty straight-forward and easy swap. I'm glad that I *had* to do it.

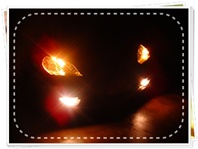
Here is what my stock 2001 sedan gauges look like. YMMV - literally.
More pics below...


Okay, those two holes on the top of the black bezel - there's screws in there. Take those out and then you should have something like this:

If you're a crackhead, like me, then you will want to take a picture of the bezel around your new gauges - like so!

Okay, I don't have this pictured, but once you have the bezel out, you should see three screws. Two are on opposite sides on the bottom of the gauge cluster, and one is at the top. Take all three of those out, and the pull the gauge cluster forward, a-like-a-so:
 --- วิธี Wiring ---
I hope you're not getting too confused, because we're just getting started! "Ohhhh yeaaaaah," says the Kool-aid man.
the white-red wire that goes into the green connector listed both as going into the same pin slot. From looking at the diagram , I went with the white-red wire from the blue cluster and moved it over to the green one. Just FYI. Also, the red-white wire from the green cluster was the only wire I didn't use. . Like it's been said before, the only wire needing to be extended was the Yellow-Black wire being taken from the green connector to the blue connector. I just cut, spliced using butt connectors, and taped over the connectors just to be safe. The only wire I needed that was listed that I didn't have was the green-black wire in the blue connector. Everything works fine so I'm going to assume it's either DRL or Side SRS. Both of which my car doesn't have.


Olright! Those pictures tell you that you have to take the original pin layout, trash it, and then rewire your connections. Sounds easy, right? Wrong. This part should take you less than 2 hours, but that's 2 hours of fiddling with small, 18 gauge wire. It's not fun.
Here's what the blue and green connections on my cluster looked like when I took the cluster out:


And now, here's what they look like pulled *somewhat* apart:


Ooo look at the purty why-rung, mah! These are somewhat rewired connections.

And now, the final product (sorry for not enough in-depth-ness...I was in a hurry).


Oh my. Would you lookey here? It's all lighted up and stuffs. We gots ourselves a keeper!
 --- ในส่วนนี้ผมขอเพิ่มเติมวิธีถอด pin ออกจาก socket นะครับ ---
 --- และสุดท้าย Wiring Diagram แบบเป็นไฟล์ Excel ---
Download
--- และสุดท้าย Wiring Diagram แบบเป็นไฟล์ Excel ---
Download
มึนกันมั้ยครับเหอๆ

หวังว่าคงเป็นประโยชน์ต่อเพื่อนๆนะครับผม
 credit : http://www.civicforums.com/ http://www.dirtysamurai.com/

 V_ES
V_ES


 xcyber
 kim_possible


